Introduction
ActiveX control is a term used to denote reusable software components that are based on Microsoft Component Object Model (COM) that allows the developer to create objects or controls that can be used to "activate" content on the World Wide Web.
I have read lots of stuffs over the internet but I have not find any complete guideline or example through the process I can build an ActiveX Control for web using ATL with VC++6.0. I wrote this article because I couldn't find a unified description of this process anywhere on the Web and also from my hurdles. I am going to present you a complete example with necessary stuffs. Hope this will help you to understand how we can build a Scriptable ActiveX control for web using ATL and also you will get the clear vision about the ActiveX security details. It's written with as much detail as possible, but with the assumption that the reader basically knows his stuff.
In this article, I have tried to present you an example of Scriptable ActiveX Web Control using ATL which will display a Label Control with the current Date and Time on your Internet Explorer. Also you will be guided step by step on creating the control using Microsoft VC++6.0 as safe for WEB.
Safety and security
The security concerns associated with ActiveX control is mainly due to the fact that ActiveX controls can do almost anything that a normal application can. Therefore, both malware and useful form ActiveX controls exists; thus the threat level of an ActiveX control can be associated with how trusted its author is.
However, there is one famous case of ActiveX controls safety concern: Internet Explorer. Internet Explorer has the ability to run ActiveX controls within a web page. This is both a blessing and a pain.
ActiveX controls like Adobe Reader, Adobe Flash Player, Apple QuickTime Player, Microsoft Windows Media Player, Real Networks RealPlayer, and Sun Java Virtual Machine are routinely used by Internet surfers every hour of a day all across the globe.
However, opening a web page that contains a harmful ActiveX control, and then allowing Internet Explorer to run that harmful control, would be same as running a malware on the computer. Fortunately, Internet Explorer 6 and Windows Vista have taken actions to reduce such risks.
Requirements for Scriptable ActiveX Controls
Microsoft has published a document that describes all aspects of component object safety with regard to scripting ActiveX controls.
Before registering your control as safe for scripting, you must ensure that your control does not take any actions that may be unsafe when used by a scripting client. Unsafe actions include exposing information normally kept private, such as passwords and other sensitive information, executing files, and making dangerous system calls.
Another type of object safety concerns the use of parameters and properties with the control. When used with a scripting client, a safe control must ensure that the control can continue to function with any possible combination of properties defined by the user.
Design a Scriptable ActiveX Controls
A scriptable ActiveX control is a control that is constructed so that it is appropriate for use by scripting clients. Scriptable controls are designed to be safe when used in a Web browser, such as Internet Explorer, or by scripts written for the Windows Scripting Host (WSH). Scriptable controls also support mechanisms to simplify passing parameters to the control via a scripting language.
By default, ActiveX controls are not considered safe for scriptable clients. If you have an ActiveX control that could be useful by scripting clients, taking a few simple steps can expand the usefulness of your control. If you're using ATL, these changes typically take just a few minutes.
To be scriptable, an ActiveX control must meet the following requirements:
Be safe when executed by an arbitrary scripting client.
Be registered as "Safe for Scripting".
Support the IPersistPropertyBag interface. This is technically not a requirement, but it simplifies the task of passing parameters to the control.
Creating a Scriptable ActiveX Control
To create a Scriptable ActiveX control, use Microsoft Visual C++ 6.0 to perform the following steps:
1. File->New->Projects.
2. In the New Project dialog, as shown in Figure 1, select "ATL COM AppWizard".
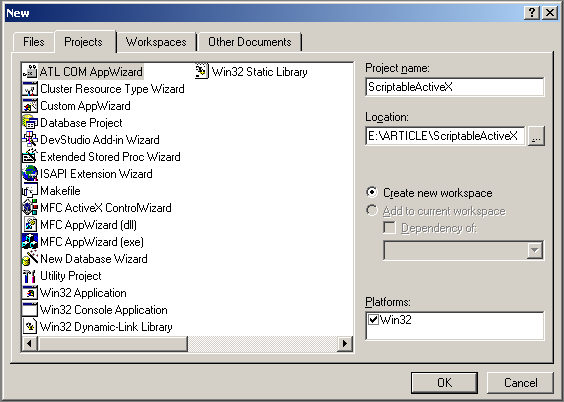
Figure 1. New Project Dialog
3. Name the project ScriptableActiveX; for Location, enter the working folder for the project's source code, and then click the OK button.
4. You will see a screen, as shown in Figure 2, that gives you several choices. The first choice is "Server Type". We are going to build a Server DLL, so make sure that the Server Type is set to "Dynamic Link Library".
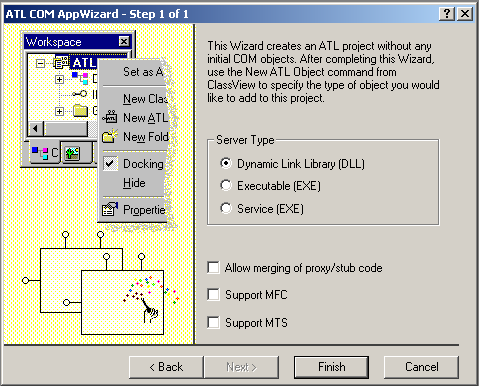
Figure 2. ATL COM AppWizard
5. The other three checkboxes below do not concern us for this particular project, so we can ignore them. Press the finish button to have the Wizard generate to appropriate files for you.
6. A "New Project Information" window, as shown in Figure 3, will appear to tell you what files are going to be created. Press the Ok button to accept this.
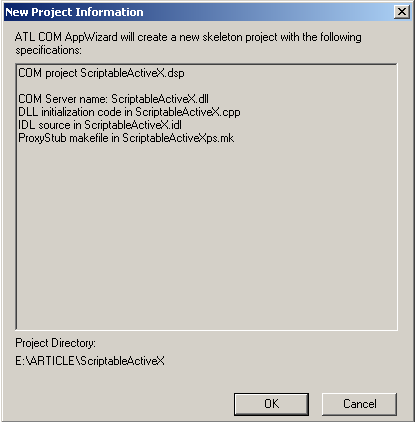
Figure 3. New Project Information
Creating a new ATL object
1. From the Insert menu, select "New ATL Object" menu item. The "ATL Object Wizard" window, as shown in Figure 4, will appear.
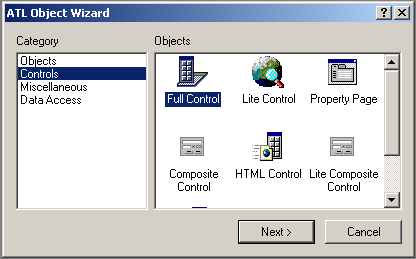
Figure 4. ATL Object Wizard
2. Select Controls from the wizard's Category list box, and then select Full Control as the control type. Click Next to begin adding ScriptableLabel control to the project.
3. The "ATL Object Wizard Properties" dialog, as shown in Figure 5, will appear so that you can define your control's properties. For full controls, such as ScriptableLabel, the dialog box offers four tabs.
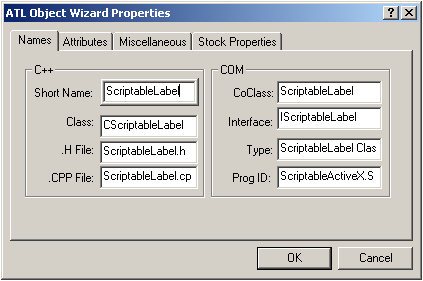
Figure 5. ATL Object Wizard Properties
4. All component types present a Names property page that contains naming attributes for ATL components. You only need to fill in the Short Name property for ScriptableLabel and the other fields are filled in automatically.
5. The second tab, as shown in Figure 6, for most component types is the Attributes property page, which is used to collect information about the component. All these values are the default options, except "Support Connection Points" properties for the component. Connection points are used to supply events to a control's container.
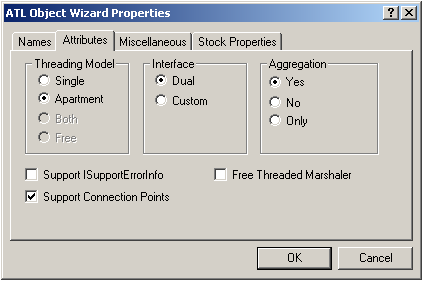
Figure 6. ATL Object Wizard Properties (Attributes)
6. The third tab, as shown in Figure 7, is the Miscellaneous tab. It contains attributes specific to ActiveX controls.
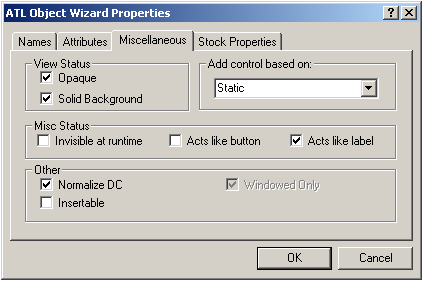
Figure 7. ATL Object Wizard Properties (Miscellaneous)
7. The final tab, as shown in Figure 8, in the dialog box is Stock Properties. It contains a list of all stock properties that can be implemented by an ActiveX control.
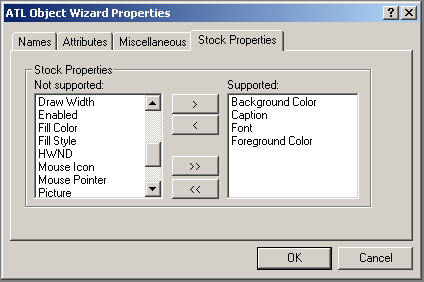
Figure 8. ATL Object Wizard Properties (Stock Properties)
8. The ScriptableLabel control uses the following stock properties:
Background Color
Caption
Font
Foreground Color
After you select the stock properties listed here, click OK to close the dialog box. The ATL New Object Wizard then generates the necessary code and adds it to your project.
Modify Control Attributes
The default handler for OnCreate will superclass a default instance of the Windows CStatic class. Apply the following window styles changes to the OnCreate() member function to the ScriptableLabel control:
 Collapse | Copy Code
m_ctlStatic.Create( m_hWnd,
                    rc,
                    _T("Static"),
                    WS_CHILD|WM_PAINT);
Retrieving Ambient Properties
When the control is initially loaded, it collects the current foreground color, background color, and font from its container. A good time to collect ambient properties is when the control and its container negotiate the client site. Add the following source code to the ScriptableLabel.cpp source file. This function overrides the base class implementation of
SetClientSite() and stores the ambient values of these three properties.
Collapse | Copy Code
STDMETHODIMP CScriptableLabel::SetClientSite(LPOLECLIENTSITE pSite)
{
    HRESULT hr = CComControlBase::IOleObject_SetClientSite(pSite);
    if(!m_pFont && pSite)
    {
        hr = GetAmbientFontDisp(&m_pFont);
    }
    GetAmbientBackColor(m_clrBackColor);
    GetAmbientForeColor(m_clrForeColor);
    return hr;
}
Add the following member function declaration to the CScriptableLabel class:
Collapse | Copy Code
STDMETHOD(SetClientSite)(LPOLECLIENTSITE pSite);
Drawing the Control
The
OnDraw() function is called by the ATL framework, passing in a structure that contains various bits of information needed to actually paint information on the screen. Our implementation isn�t much more complicated than it would be if we were simply displaying the current Date and Time. Add the following drawing code for the control to the ScriptableLabel.h header file.
Collapse | Copy Code
void DrawString( HDC hdc, RECT* rc, BSTR caption )
{
	USES_CONVERSION;
	TCHAR* pCaption = OLE2T(caption);

	DrawText( hdc,
			 pCaption,
			 lstrlen( pCaption ),
			 rc,
			 DT_WORDBREAK );
}

HRESULT OnDraw(ATL_DRAWINFO& di)
{
	RECT& rc  = *(RECT*)di.prcBounds;
	HDC   hdc = di.hdcDraw;

	COLORREF clrFore, clrBack;
	OleTranslateColor(m_clrForeColor, NULL, &clrFore);
	OleTranslateColor(m_clrBackColor, NULL, &clrBack);
	SetTextColor(hdc, m_clrForeColor);
	HBRUSH hbrBtn = CreateSolidBrush(m_clrBackColor);

	FillRect(hdc, &rc, hbrBtn);
	DrawString(hdc, &rc, m_bstrCaption);

	DeleteObject(hbrBtn);
	return 0;
}
Implementing IPersistPropertyBag
To simplify the use of ScriptableLabel in a scripting client, such as Internet Explorer, the control must support the IPersistPropertyBag interface. The ATL class library includes a class, IPersistPropertyBagImpl, that provides a default implementation of IPersistPropertyBag that is sufficient in most cases.
1. Add the following line to your class derivation list:
Collapse | Copy Code
public IPersistPropertyBagImpl<CScriptableLabel>
2. Add the following lines to your COM_MAP:
Collapse | Copy Code
COM_INTERFACE_ENTRY(IPersistPropertyBag)
Marking the Control as Safe for Scriptable Clients
You can easily add support for marking the Control as Safe for Scriptable Clients by implementing the IObjectSafety interfaces. This is done by deriving your control from the default ATL implementation, IObjectSafetyImpl.
You can use two methods to mark a control as safe for scripting clients:
Make appropriate entries directly in the System Registry.
Implement the IObjectSafety interface.
Microsoft recommends that you use new controls to implement the IObjectSafety interface instead of making Registry entries. IObjectSafety enables the control to apply much finer-grained safety policies than possible using the Registry.
ATL provides a default implementation of IObjectSafety that you easily can take advantage of by deriving your class from the IObjectSafetyImpl class.
1. Add the following line to your class derivation list:
Collapse | Copy Code
public IObjectSafetyImpl<CScriptableLabel,
                        INTERFACESAFE_FOR_UNTRUSTED_CALLER |
                        INTERFACESAFE_FOR_UNTRUSTED_DATA>
Two template arguments are passed to IObjectSafetyImpl:
The name of the class deriving from IObjectSafetyImpl.
The type of safety to be applied to the control.
Two values may be passed for the safety options:
INTERFACESAFE_FOR_UNTRUSTED_CALLER specifies that your control can be used safely by a scripting client and does not violate any of Microsoft's security or safety guidelines. INTERFACESAFE_FOR_UNTRUSTED_DATA specifies that your control will work (or at least degrade gracefully) in the presence of any possible set of par
2. Add the following lines to your COM_MAP:
Collapse | Copy Code
COM_INTERFACE_ENTRY(IObjectSafety)
Compiling the Scriptable ActiveX Control
Compile the ScriptableActiveX project. The compiler will register your new DLL in the registry so that other programs can make use of it. You can test the control in a variety of control containers, including Visual Basic and Visual C++. You will find lots of examples using Visual Basic and Visual C++. Better! we consider as web control.
Because the ScriptableLabel control is scriptable, you can also use the control on an HTML page with Internet Explorer. Lets try it out.
Building a Signed ActiveX Control
To use your control on web pages, it is very convenient to distribute it as a .cab (cabinet file). This is a compressed archive - the classic use is to put the .cab file on a web server, and refer to it from web pages that host the control. Internet Explorer is smart enough to download and install the control if it is not already installed on the client machine, and to selectively update any files that are newer in the .cab file. Microsoft provides CABARC.EXE for creating and editing .cab files.
The Contents of a CAB File
A CAB file contains at least two files in the archive: an ActiveX component file (.EXE, .DLL or .OCX file), and an .INF file.
Component File (.EXE, .DLL or .OCX): The type of ActiveX component you create determines the file extension of the file included here. All ActiveX controls have a .OCX extension. Other ActiveX components either .EXEs or .DLLs. This file is your ActiveX component being installed.
.INF: This is the Information file that contains information about what other files your ActiveX component depends on (dependency files), where to get copies of those files, and how to install those files.
Creating a CAB File
This section describes creating CAB files for distributing ATL and MFC controls over the Internet.
To create a CAB file:
1. Create an INF file.
2. Run the CABARC utility.
1. Creating an INF File
The INF file is a text file that specifies the files (such as DLLs or other OCXs) that need to be present or downloaded for your control to run. An INF file allows you to bundle all the needed files in one compressed CAB file. By default, files with the same version numbers as existing files on the user's hard disk will not be downloaded.
As an example, the following INF file will be used to create a CAB file for the ScriptableActiveX control.
Collapse | Copy Code ; Sample INF file for SCRIPTABLEACTIVEX.DLL
[version]
; version signature (same for both NT and Win95) do not remove
signature="$CHICAGO$"
AdvancedINF=2.0
[Add.Code]
ScriptableActiveX.dll=ScriptableActiveX.dll
ScriptableActiveX.inf=ScriptableActiveX.inf
[ScriptableActiveX.dll]
file-win32-x86=thiscab
clsid={B8748B60-E34D-42AA-9309-8012CA4964AC}
FileVersion=1,0,0,1
RegisterServer=yes
[ScriptableActiveX.inf]
file=thiscab
; end of INF file
The
clsid is the CLSID of the control to be installed.
2. Running the CABARC Utility
Once you have created an INF file, run the CABARC utility to create the CAB file. You should run CABARC in the directory that contains your source files. On the command line, put the source files in the order they appear in the INF and the INF file last. For example, to make a CAB file for the Polygon control from the INF above, use the following command:
Collapse | Copy Code CABARC -s 6144 n ScriptableActiveX.cab ScriptableActiveX.dll ScriptableActiveX.inf
The
-s option reserves space in the cabinet for code signing. The
n command specifies that you want to create a CAB file.
Code Signing Tools
Microsoft provides code signing tools as part of the "Microsoft .NET Framework software development kit (SDK) 1.1". To download the SDK, visit the following Microsoft Web site: .NET Framework SDK Version 1.1. After you install the SDK you will be able to find the code signing files in the following location on your PC: "\Program Files\Microsoft.NET\SDK\v1.1\Bin". From the many files found in the above BIN directory the following are of interest to us:
signcode.exe
makecert.exe
cert2spc.exe
chktrust.exe
Recently, with the introduction of "Studio 2005" Microsoft has released a new set of tools. The new set of tools is provided as part of the "Visual Studio 2005" and in the "Platform SDK". To download the "Platform SDK", visit the following Microsoft Web site: Platform SDK Full Download. After you install the SDK you will be able to find the code signing files in the following location on your PC: "\Program Files\Microsoft Platform SDK\Bin". From the many files found in the above BIN directory the following are of interest to us:
signtool.exe
makecert.exe
cert2spc.exe
All the above mentioned tools are actually small console programs that should be run from a command prompt. When run, each program expects command-line parameters in a special syntax. Now, we will demonstrate how to do it in this article.
Signing a CAB File
Security is becoming increasingly important for software and media developers. "Code Signing" enables end users of your software to verify that the code you provide comes from the rightful source and that it has not been maliciously altered or accidentally corrupted.
Code signing technology is available for many years, but many software vendors refrained from using it because of the complexity involved in the process. However - since the release of "Windows XP Service Pack 2" - code signing can not be ignored any more.
With XP SP2, when downloading an UN-SIGNED program with Internet Explorer and choosing to open it (or even if saved to a file and later opened via Windows Explorer), the browser will display the "Security Warning" dialog. BUT when downloading a SIGNED program the browser does not result in annoying error messages complaining that it is an unsigned or unsafe control.
You have 2 options to sign your code:
Option-1. Using Test Certificate
Option-2. Using Public Certificate
Option-1: Using Test Certificate
Before you start with the process it is highly recommended that you create a "TEST certificate", and use it to sign your program as a test run. A program signed by this certificate must not be distributed on the net.
Use the following steps to sign and validate the .cab file:
1. Type the following at a command prompt to create a private key file, Mycert.pvk.
Collapse | Copy Code makecert -sv "mycert.pvk" -n "CN=My Company" mycert.cer
The file created in this step, Mycert.cer, is used to create an .spc file. Type the password in the dialog box.
2. Create an .spc file from the certificate file with the correct password. To do so, type the following line at a command prompt:
Collapse | Copy Code cert2spc mycert.cer mycert.spc
Note that this step involves creation of a test private key. Alternatively, valid certificates can be created through Microsoft Certificate Server for Intranet use or purchased from external vendors for Internet use.
3. Create a Personal Information Exchange file. This step is optional. You will need it only if you select to sign your code using SIGNTOOL.EXE as described above. The following command line may be used to create a "Personal Information Exchange" (PFX) file:
Collapse | Copy Code pvk2pfx -pvk mycert.pvk -pi Pass1 -spc mycert.spc -pfx mycert.pfx -po Pass2 -f
PVK2PFX.EXE expects 2 passwords:
Pass1: - Provide the same password you used when creating the Private & Public keys.
Pass2: - Provide a new password to protect the PFX file.
Once signed you can distribute the ActiveX component to any user, BUT the user must install certificate chain. If you want users to install an ActiveX component without the Root and Intermediate certificates then buy a Public code-signing certificate.
Option-2: Using Public Certificate
To be able to sign your code you will need a certificate. Certificates are issued by special Internet organizations called CA (Certificate Authority). There are many such organizations, the most prominent ones are: verisign.com and tawthe.com.
You can get a full list of CAs by going to: Microsoft Root Certificate Program Members
However - acquiring a certificate is quite a tedious and time consuming process, (The CA has to identify you or your organization before it can issue a certificate) and you should expect to pay few hundred of dollars for the certificate.
Finishing Touches
Now, Use the key information to sign the .cab file:
Collapse | Copy Code signcode -v mycert.pvk -spc mycert.spc ScriptableActiveX.cab -t [Timestamp server URL]
Or, the following commands may be used to sign your code using SIGNTOOL.EXE:
Collapse | Copy Code signtool sign /f mycert.pfx /p Pass2 /v ScriptableActiveX.cab /t [Timestamp server URL]
Pass2: Enter here the second password you used when creating the PFX file.
Note Specify the timestamp server URL at this step. The timestamp server URL provides a place to enter or edit the location of a timestamp server. A timestamp server validates the date and time that the cabinet file was signed. Certificate files can expire after a certain period of time. Contact your certificate file provider (certificate authority) for the location of their timestamp server. The URL of a time stamping service provided for free by verisign.com http://timestamp.verisign.com/scripts/timstamp.dll
Validate a CAB File
Follow this procedure to validate a .cab file:
Option-A: Using CHKTRUST
a. Type the following at a command prompt to run SETREG.EXE on the client system with the TRUE value so that the test certificates are recognized:
Collapse | Copy Code setreg -q 1 TRUE
b. Run CHECKTRUST.EXE to ensure that the CAB file is signing correctly:
Collapse | Copy Code chktrust ScriptableActiveX.cab
Expected results:
Collapse | Copy Code ScriptableActiveX.cab: Succeeded
Option-B: Using SIGNTOOL
Run SIGNTOOL.EXE to verify the signing:
Collapse | Copy Code signtool verify /v /a ScriptableActiveX.cab
Expected results:
Collapse | Copy Code ScriptableActiveX.cab: Succeeded
Option-C: Using Properties
You can also use the following method to verify your digital signature:
Open Explorer.
Browse to the file you just signed.
Right Click the file name and select "Properties".
Explorer will present you with the properties dialog of the file. This properties dialog will include a new tab "Digital Signatures". You can now read the details of the signature in this tab.
Embedding a Signed CAB File on a Web Page
ATL and MFC controls are embedded in Web pages using the <OBJECT> tag. Within the <OBJECT> tag, you need to specify three attributes for the control:
Collapse | Copy Code
<OBJECT classid=B8748B60-E34D-42AA-9309-8012CA4964AC
	id=ScriptableLabelControl
	CODEBASE ="ScriptableActiveX.cab#version=1,0,0,1">
</OBJECT>
The ID parameter refers the name of the control. The CLASSID parameter refers the CLSID of the control. And the CODEBASE parameter refers the location from which to download the control. Note that CODEBASE can point at a number of different file types successfully.
If you include the optional version number with a CAB file, the version number should refer to the control being downloaded. For example, since ScriptableActiveX.dll has a version number of 1, 0, 0, 1, the version for the CAB is also 1, 0, 0, 1.
If you do not include the version number, older versions of the same control will not be replaced if they are found on the client machine.
Testing the Scriptable ActiveX Web Control
Adding controls by hand is not a simple process. The CLSID numbers are unwieldy to type, and it can be difficult to visualize the effects of the parameter settings on the control. To help with these difficulties, Microsoft created the ActiveX Control Pad, which can be obtained from their web site at Microsoft ActiveX Control Pad.
To test the Scriptable ActiveX Web Control with JavaScript, you may use ActiveX Control Pad to create or you may find it easier to lay out your page in your preferred HTML editor as the following HTML code:
Collapse | Copy Code
<HTML>
<HEAD>
<TITLE>Scriptable ActiveX Web Control</TITLE>
<SCRIPT LANGUAGE="JavaScript">
	function NotifyActiveX(e)
	{
		if ( e.readyState != 4 ) return;
		window.setInterval("document.all.ScriptableLabelControl.caption=(new Date()).toString()",1000);
	}
</SCRIPT>
<STYLE TYPE="text/css">
#ScriptableLabelControl {
	width: 250px;
	height: 27px;
	padding: 10px;
	border: thin solid #408080;
	margin-left: 10em;
}
</STYLE>
</HEAD>

<BODY>
<OBJECT
  ID="ScriptableLabelControl"
  onReadyStateChange="NotifyActiveX(this)"
  CLASSID="CLSID:B8748B60-E34D-42AA-9309-8012CA4964AC"
  CODEBASE="ScriptableActiveX.cab">
</OBJECT>
</BODY>
</HTML>
Save this HTML code in your web server, and browse it!
Internet Explorer will prompt the user before downloading and installing the ActiveX control. If Internet Explorer is attempting to install the Signed ActiveX control automatically it shows the prompt, as shown in Figure 9.
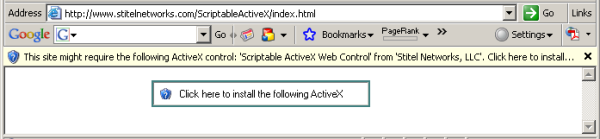
Figure 9. Install ActiveX
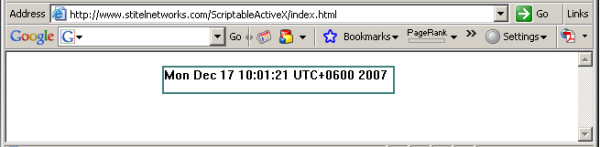
When prompted with a certificate, please accept it. When downloading and installation process will be finished, the current date and time should appear, as shown in Figure 10.
Figure 10. Scriptable ActiveX Control
If you see the current date and time displayed properly in your browser, CONGRATULATIONS! ActiveX and scripting are working properly.
Note:
If you see a date and time but it isn't the right time, your PC's clock is set wrong! Double-click the time in the system tray to correct it.
If you see a blank space, ActiveX is probably working properly, but not scripting.
If you see the message ActiveX is not supported, then your browser doesn't recognize ActiveX at all. Netscape, Opera, or other browsers usually do not support ActiveX.
When you think you've corrected any problem you are having with this, simply refresh the page [press F5] to try again.
Conclusion
For a control to be scriptable, it must follow Microsoft's object safety guidelines and be marked as safe for scripting. In this article, you examined the IObjectSafety interface and learned how a control built using ATL can take advantage of IObjectSafety. An example of a safely scriptable ActiveX control helped you explore this topic.
댓글