Creating GridView Columns Dynamically (Part 2)
|
|


http://www.dotnetbips.com/articles/0b4f8e1c-39e6-4070-abc0-7a970e7553bc.aspx
Creating GridView Columns Dynamically (Part 2)
Introduction
In Part 1 you learned to create Bound Fields and Command Fields dynamically. Often your grid layout is beyond the capabilities of in-built column types and you need to use Template Fields. For example, let's say you are creating a product catalog. Certainly normal tabular layout is not suitable here as you want to display each record in a highly customized format. Template fields can come handy in such situations. In this article I am going to illustrate how template fields can be added dynamically. You will learn two techniques of doing so:
- Using LoadTemplate() method
- By creating a custom template class
Adding Template Fields Using LoadTemplate() Method
In order to work with this example you need to create a new web site in Visual Studio. Drag and drop a GridView on the default page. Also drag and drop an SqlDataSource control. We will be setting various properties of these controls via code. In the first method of adding template fields we will be using LoadTemplate() method. The LoadTemplate() method is available to all template controls including the Page. It accepts virtual path of a file and loads the template specified therein. The return value of LoadTemplate() is an object that implements ITemplate interface.
In our example we will create the template in a User Control. To do so, add a new Web User Control to the web site and name it as ItemTemplate.ascx. Key in the following markup to it.
<%@ Control Language="C#" AutoEventWireup="true"
CodeFile="ItemTemplate.ascx.cs" Inherits="ItemTemplate" %>
<asp:Label ID="Label1" runat="server"
Text='<%# Eval("EmployeeID") %>'>
</asp:Label>
<asp:Label ID="Label2" runat="server"
Text='<%# Eval("FirstName") %>'>
</asp:Label>
<asp:Label ID="Label3" runat="server"
Text='<%# Eval("LastName") %>'>
</asp:Label>
Notice above markup carefully. It contains three Label controls. The Text property of each Label is bound with EmployeeID, FirstName and LastName columns of Employees table respectively. The Eval() expression is one way data binding expression of ASP.NET and accepts the name of the column to bind. This user control will act as our ItemTemplate later.
Now open the code behind file of the default web form and key in the following code in Page_Load event handler.
protected void Page_Load(object sender, EventArgs e)
{
SqlDataSource1.ConnectionString =
@"data source=.;initial catalog=northwind;integrated security=true";
SqlDataSource1.SelectCommand =
"select employeeID,FirstName,LastName from employees";
if (!IsPostBack)
{
GridView1.DataSourceID = "SqlDataSource1";
GridView1.AutoGenerateColumns = false;
TemplateField tf1 = new TemplateField();
tf1.ItemTemplate=LoadTemplate("ItemTemplate.ascx");
GridView1.Columns.Add(tf1);
}
}
The code points the ConnectionString property of SQL data source control to Northwind database. The SelectCommand property specifies a SELECT statement that fetches EmployeeID, FirstName and LastName columns of Employees table. Next, it sets DataSourceID property of GridView control to the ID of SQL Data Source control. Also, AutoGenerateColumns property is set to false as we will be adding columns programmatically. Next few lines are important. The code then creates an instance of TemplateField class. The TemplateField class represents a template column of GridView class. The ItemTemplate property of TemplateField class is then set to the return value of LoadTemplate() method. The LoadTemplate() method accepts a virtual path of the file containing template to be loaded (ItemTemplate.ascx in our case). The TemplateField is then added to the Columns collection of GridView control.
Run the web form and your browser should display something as shown below:
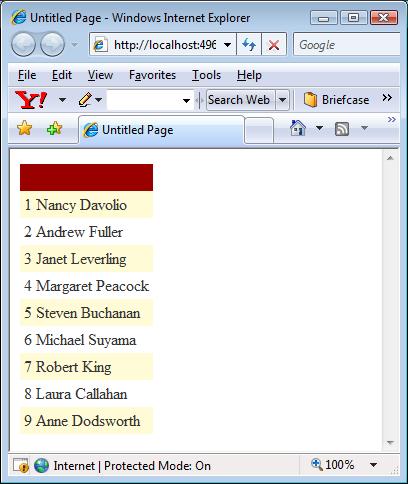
Notice how the template specified in the user control is applied. Also, notice that header is shown blank because we did not specified HeaderTemplate. You can either specify it or turn the header off.
Adding Template Field Using Custom Template Class
Now that you know how to use LoadTemplate() method let's move to another possibility. You learnt in the last example that LoadTemplate() method returns an object that implements ITemplate interface. You yourself can create such a class and use it directly in your code instead of using LoadTemplate() method.
To begin with add a new class named MyTemplate to App_Code folder. Key in the following code to MyTemplate class.
public class MyTemplate:ITemplate
{
    private string colname;
 public MyTemplate(string colname)
 {
        this.colname = colname;
 }
    public void InstantiateIn(Control container)
    {
        LiteralControl l = new LiteralControl();
        l.DataBinding += new EventHandler(this.OnDataBinding);
        container.Controls.Add(l);
    }
    public void OnDataBinding(object sender, EventArgs e)
    {
        LiteralControl l = (LiteralControl)sender;
        GridViewRow container = (GridViewRow)l.NamingContainer;
        l.Text = ((DataRowView)container.DataItem)[colname].ToString();
    }
}
The code creates a class called MyTemplate that implements ITemplate interface. The ITemplate interface contains a single method - InstantiateIn() - that you must implement. The code then declares a string variable to hold a column name to be displayed. The column name is set in the constructor of the class. Then InstantiateIn() method is implemented. The method receives an object of type Control that represents container or parent control. Inside we create a LiteralControl and attach an event handler (OnDataBinding) to its DataBinding event. This event is raised when the container control calls DataBind() method on itself. The LiteralControl is then added to the Controls collection of the container control.
The OnDataBinding() event handler does the job of data binding the LiteralControl with the required data. It then gets a reference to the row in which the control is being added using NamingContainer property. Finally, Text property of LiteralControl is set to the value of database column as specified in the constructor. This completes our custom template class.
Now add a new web form to the same web site. Drag and drop a GridView and SqlDataSource control as before. Add the following code in the Page_Load event handler of the form.
protected void Page_Load(object sender, EventArgs e)
{
SqlDataSource1.ConnectionString =
@"data source=.;initial catalog= northwind;integratedsecurity=true";
SqlDataSource1.SelectCommand =
"select employeeID,FirstName,LastName from employees";
if (!IsPostBack)
{
GridView1.DataSourceID = "SqlDataSource1";
GridView1.AutoGenerateColumns = false;
TemplateField tf1 = new TemplateField();
MyTemplate t1 = new MyTemplate("FirstName");
tf1.HeaderText = "First Name";
tf1.ItemTemplate = t1;
TemplateField tf2 = new TemplateField();
MyTemplate t2 = new MyTemplate("LastName");
tf2.HeaderText = "Last Name";
tf2.ItemTemplate = t2;
GridView1.Columns.Add(tf1);
GridView1.Columns.Add(tf2);
}
}
The code sets the properties of SqlDataSource and GridView as before. Notice the code marked in bold letters. The code creates an instance of TemplateField class as before. This time the ItemTemplate property of TemplateField is set to a new instance of MyTemplate class. The column names - FirstName and LastName - are passed in the constructor. Finally, the template fields are added to the Columns collection of GridView class.
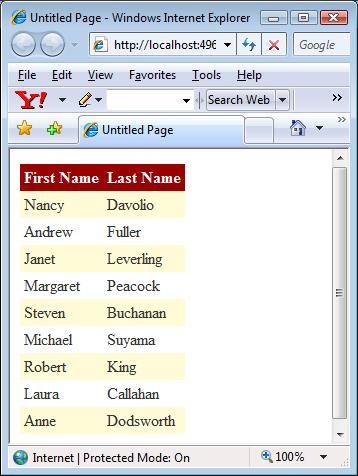
The following screen shot shows a sample run of the above web form.
That's it! Happy coding.
'IT-개발,DB' 카테고리의 다른 글
| [개발/ASP] Creating GridView Columns Dynamically (Part 1) (0) | 2015.02.24 |
|---|---|
| [개발/ASP] Creating GridView Columns Dynamically (Part 1, 2) 소스코드 (0) | 2015.02.24 |
| [개발/문서] 디자인패턴 - ① (0) | 2015.02.04 |
| [IT/개발] 유명한 ZTERM 1.41 텔넷 프로그램 (0) | 2015.02.04 |
| [mysql] 제로카운터 - zerocounter 100일간만 데이터보관법 (0) | 2015.02.03 |


댓글